Data Preparation
Using Scale References
Scale references are used to ensure that the 3D model is created with accurate real-world dimensions. Without them, the scale of the model will be arbitrary. By using scale references, such as scale bars or scale crosses, you can define the correct scale for your model.
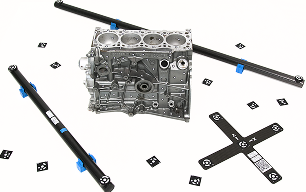
Figure 3 Scale references
Scale References Types
Scale references come in two types: Scale bars and Scale crosses.
A Scale bar allows you to obtain the correct scale for your model by using the distance between two targets. It defines the scale of an object but only along a single axis, making it useful for determining size but providing no information about orientation in 3D space.
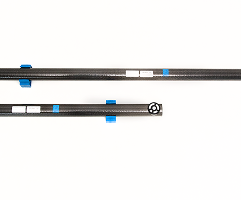
Figure 4 Scale bar
In contrast, a Scale cross provides a reference not only for the scale of an object but also for its position and orientation in 3D space. It consists of two intersecting scale bars. This comprehensive reference is particularly valuable when you need to determine both the size and alignment of an object relative to the scene.
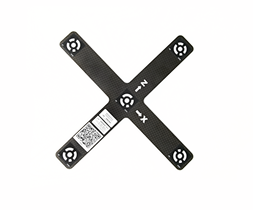
Figure 5 Scale cross
If you do not have a physical scale cross-reference, you can use a printed version, available as a PDF document at C:\Program Files\Artec\Artec Studio [version].
The file names are ASC A4.pdf for Europe and ASC US Letter.pdf for the USA.
Creating Scale References in Artec Studio Lite
In order to detect the real object’s dimensions, you need to add scale references in Artec Studio Lite before running the Create Preview algorithm.
First, open the scale reference creation dialog in Artec Studio Lite. You can do it either by:
Going to File → Coded targets and scalebars, or
Going to Tools → AI Photogrammetry → Create Preview → Settings. Make sure that a photoset is selected in Workspace, then click the Edit button in the Scale reference section.
To add a Scale bar:
Define the IDs of the two targets, the distance between them (in millimeters), and the name of the scale bar. Note that the IDs must be unique and fall within the range of 1 to 516.
Click the Create reference button.

Figure 6 Creating Scale bar
To add a Scale cross:
Define the IDs of the two pairs of targets, the distance between them (in millimeters) in each pair, and the name of the scale bar. Note that the IDs must be unique and fall within the range of 1 to 516.
Finally, click the Create reference button.
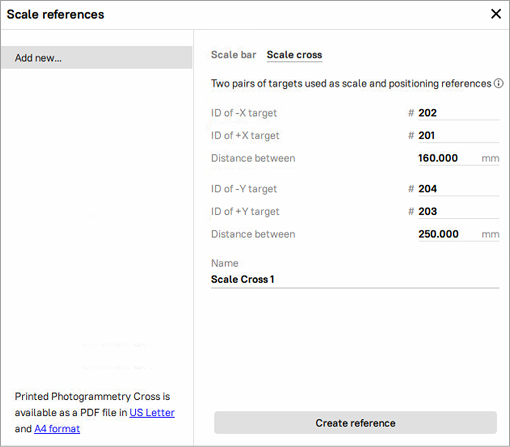
Figure 7 Creating Scale cross
The newly created scale references will appear in the list of all references on the left.
Capturing Data
General Recommendations
Here are some general recommendations on the capturing procedure, including lighting, capture methods, camera selection, and more:
Capture the object in a well-lit environment. Aim for a strong ambient light. The best light conditions are typically achieved by capturing outside on a cloudy day.
Make sure the entire object is in focus, with no areas blurred. If you find any blur, add more light to the scene, slightly close the lens aperture or do both.
Ensure the entire object fits within the camera frame and is separated from the background. Refrain from the scenarios where the majority of the frame is covered by the object with some parts of the background still visible, as this may confuse the object detector.
For the AI non-mask algorithm, closeups are allowed if they help capture fine details of the object’s geometry.
Capture the object from all the directions so that the algorithm receives a big variety of views. A good practice here is to imagine a virtual sphere around the object and try to capture images from different angles.
You can also turn the object to another side and repeat the capture to get full 3D reconstruction. In that case make sure that images from each object orientation are imported into Artec Studio Lite as a separate photoset.
If your object lacks texture, ensure that the background contains many features.
Normally, 50-150 photos is typically enough to achieve good quality.
Note
Instead of photos, you can record a video of your object, considering the points mentioned above. Videos are treated as a set of frames and can be imported into Artec Studio Lite in the same way as photos.
Good examples for objects:
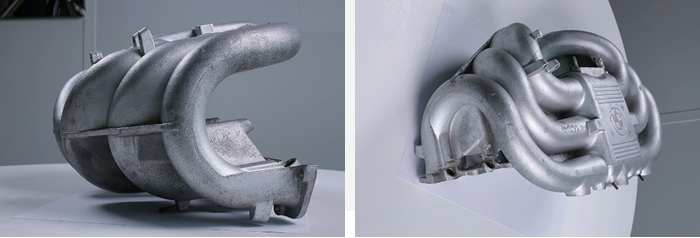
Figure 8 Good photos for the algorithm
Bad examples for objects:

Figure 9 Several objects within the camera frame
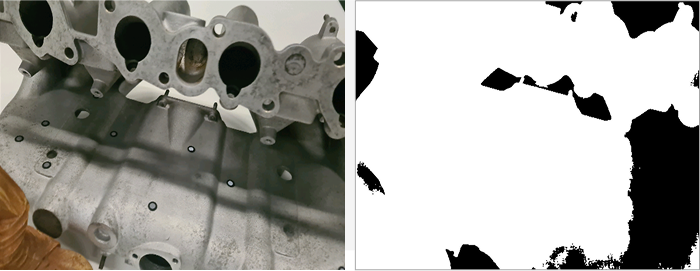
Figure 10 Closeups, when part of the object could be considered a background (allowed for the non-mask AI algorithm)
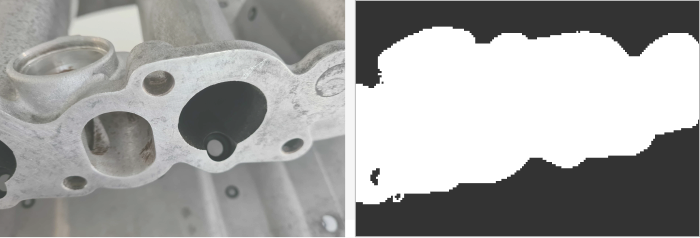
Figure 11 Overloaded background, when part of the background could be considered an object
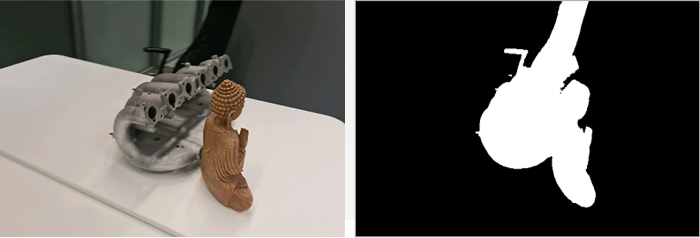
Figure 12 Good photos for the algorithm
Camera Selection
You can use multiple cameras to capture the same object. When importing the photos, Artec Studio Lite will create a single Photos object for all images, regardless of which camera captured them.
There are no strict restrictions on using different cameras, but we recommend avoiding significant differences in the field of view (FOV). Ideally, the FOV difference should not exceed a factor of 7 to ensure consistent results. In some scenarios, using different types of cameras can be beneficial:
Drone and ground photography: Capturing aerial views with a drone and detailed ground shots with a regular camera provides comprehensive coverage of the object.
Wide-angle and standard Lenses: A wide-angle lens can efficiently capture a general scene, such as an entire room, while a standard lens can be used to capture detailed shots of specific elements, like a statue in the center of the room.
Importing Data into Artec Studio Lite
To import photos/videos into Artec Studio, you need to go to File → Import → Photos and videos.
If a video file is imported, Artec Studio Lite will create a photo set in the Workspace out of it. You need to specify frame rate at which photos will be imported from the video file by entering the desired value in the Frames extracted per second option of the Import video dialog.
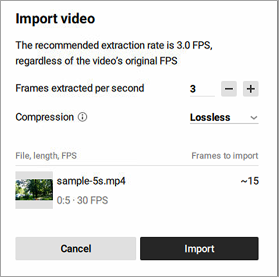
Figure 13 Import video dialog
Note
This value is not an original FPS value; it represents the extraction rate. The default value is 3, but you can adjust it. Keep in mind that increasing the value may reduce performance.
Also, you can select the desired Compression type: Lossless or Lossy. With Lossless Compression, the project size will be larger but the quality is fully preserved. In contrast, Lossy Compression reduces the project size by 20-50%.
Once you are ready, click the Import button. Selected files will be added to the Workspace as a new object of the Photos type. Video files will also be added as separate objects of the Photos type.
Viewing Photos/Videos
In Artec Studio Lite, it is possible to assess each captured photo for adequacy of texture capturing or misalignments before reconstructing a 3D model. To inspect the quality of the imported photos, follow these steps:
In the Workspace panel, double-click a set of photos or right-click a set of photos and select the Show photos. The entire list of photos it contains will appear.
For each photo, its name, focal length, and camera data will be provided.
Note
By default, all objects in the 3D View window except the pictures of the selected set will be hidden. To see other objects, select the Show other selected objects option.
Double-click an individual picture to inspect it closer. It will be opened in a viewing pop-up
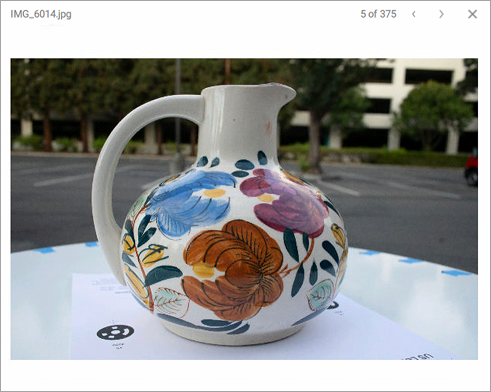
Figure 14 Viewing captured photos
Navigate between photos by clicking the right and left arrows in the top-right corner of the pop-up or by pressing the up and down arrow keys on the keyboard.
To exit the viewing mode, press either LMB or RMB and drag in any direction.
To delete a picture from the set of photos, click it in the Workspace panel by RMB and select Delete from the context menu. You can also press Delete on the keyboard.