Saving and Sharing
Exporting Model(s) to File
You can export a single model (mesh) or multiple models at a time. Models can be merged before export or exported separately.
To export a model:
Mark one or more models using
 or select frames in the scan by clicking on them while holding the Ctrl key
Right-click and select the Export → Meshes option, or go to the File → Export → Meshes command. A dialog window will appear (Figure 32)
Tip
Ctrl+Shift+E hot key does the same
Click … and specify the destination folder
Use one of the following options for file names:
Leave the field blank to use the names of the corresponding models from the Workspace panel.
Enter a custom export name. If you’re exporting multiple meshes, this name will be used as a base. For example, if you enter ‘Model’, the exported files will be named Model1, Model2, and so on
Select the appropriate file format from the Model export format dropdown list (see the description of available formats below)
If the model has texture and the selected mesh format supports it, choose an appropriate texture export format from the corresponding dropdown list
To merge the models into a single mesh before exporting, select the Merge models checkbox. Otherwise, each model selected in the Workspace panel will be exported to a separate file
To move the models to origin before exporting, select the Move to origin checkbox
Click OK
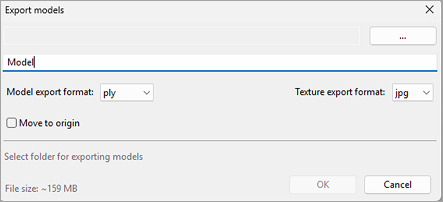
Figure 32 Dialog for exporting models
|
Stanford polygon file format (standard and with the support for vertex color) |
|
Stereolithography file format |
|
VRML file (1.0 and 2.0); actual extension is |
|
Wavefront OBJ file format |
|
Point cloud 3D format |
|
American Academy of Orthotists and Prosthetists file format |
|
Walt Disney Ptex: mesh with per-face texture mapping |
|
Direct X file format (binary or text) |
|
Custom Text file format |
|
ASTM E57 3D file format (with the support for vertex color) |
|
Universal Scene Description ( |
Note
If you type an extension in the file name field, application will use it rather than the selected mesh file format.
Saving Project
Artec Studio Lite automatically saves projects and changes made to projects instantaneously. A newly created and yet manually unsaved project is automatically saved and stored in the default Temporary folder. You can manually save the project in a preferred location using the File → Save project as… menu option or access it from the temporary folder as necessary.
Note
For more information on further importing data into Artec Studio Lite or opening saved projects, please refer to the Artec Studio User Manual.